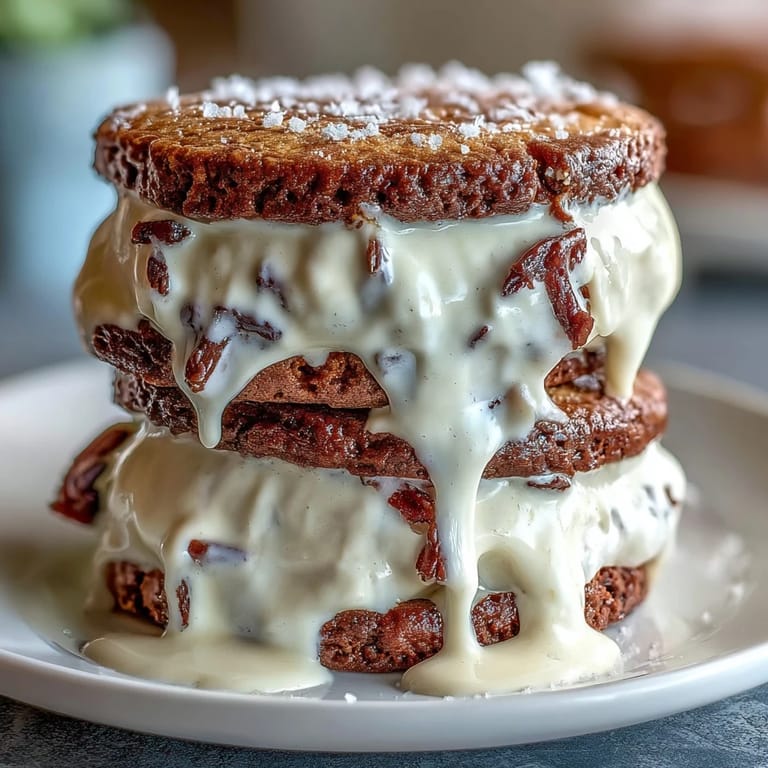
 Pin It
 Last summer, I was standing in a coffee shop line when the barista called out a vanilla frappuccino order, and it hit me—why hadn't anyone made this into an ice cream sandwich? The creamy vanilla, the hint of espresso, the way cold sweetness melts on your tongue. That afternoon, I went home and started experimenting in my kitchen, layering espresso cookie dough and vanilla bean ice cream until I got it just right. Now these sandwiches are what my friends request first when they know I'm baking.
I'll never forget my neighbor Maria's face when she bit into one of these on a sweltering July evening. She closed her eyes, and there was this moment of pure quiet before she said, 'This is what summer tastes like to me now.' That's when I realized these weren't just desserts—they were small moments of joy wrapped in parchment paper.
Ingredients
- Unsalted butter (1 cup, softened): The foundation of tender cookies that won't taste greasy; softening it properly means your dough creams smoothly.
- Brown sugar and granulated sugar (1 1/2 cups total): Brown sugar adds moisture and depth, while granulated sugar keeps the cookies crisp at the edges where they matter most.
- Large eggs (2): Room temperature eggs blend seamlessly into the dough and help bind everything together.
- Vanilla extract (2 tsp): Use real vanilla—it rounds out the espresso flavor in a way artificial extract simply can't.
- All-purpose flour (2 1/2 cups): Measure by spooning and leveling, not scooping, or your cookies will turn out dense.
- Unsweetened cocoa powder (1/2 cup): This deepens the cookie's color and adds subtle chocolate notes that play beautifully with vanilla.
- Instant espresso powder (2 tbsp): Don't skip this—it's the secret that makes people say, 'Is there coffee in these?' The flavor is bold but not bitter.
- Baking soda and salt (1 tsp and 1/2 tsp): Baking soda helps cookies spread just enough to be chewy; salt amplifies every other flavor.
- Heavy cream and whole milk (2 1/2 cups total): The ratio of cream to milk matters; too much cream makes the ice cream dense, too little and it won't freeze properly.
- Granulated sugar for ice cream (3/4 cup): This sweetens the base without crystallizing when frozen.
- Vanilla bean (1 whole, split) or vanilla bean paste (2 tsp): Real vanilla bean gives you those gorgeous black specks and authentic flavor that transforms the ice cream from plain to unforgettable.
- Pinch of salt: This tiny amount enhances the vanilla and prevents the ice cream from tasting one-dimensional.
Tired of Takeout? 🥡
Get 10 meals you can make faster than delivery arrives. Seriously.
One email. No spam. Unsubscribe anytime.
Instructions
- Make the vanilla bean ice cream base:
- Combine milk, sugar, vanilla bean seeds and pod (or paste), and salt in a saucepan over medium heat, stirring until the sugar dissolves and steam rises but nothing boils. The vanilla seeds will bloom as the mixture heats, releasing their perfume into the room. Remove from heat, discard the vanilla pod if you used a whole bean, then stir in the heavy cream and let it cool at room temperature for about 10 minutes before refrigerating.
- Chill the ice cream mixture thoroughly:
- Transfer the mixture to the fridge for at least 2 hours—overnight is even better because the flavors meld and deepen. A cold base churns faster and creates a smoother, creamier texture.
- Cream your butter and sugars:
- In a large bowl with an electric mixer, beat softened butter with brown sugar and granulated sugar until the mixture is pale, fluffy, and noticeably lighter in color, about 3 minutes. This aerates the dough and sets you up for perfectly textured cookies.
- Incorporate eggs and vanilla:
- Add eggs one at a time, beating well after each addition so they fully incorporate rather than sitting in little yellow streaks. Add vanilla extract last, mixing just until combined.
- Combine dry ingredients separately:
- In another bowl, whisk together flour, cocoa powder, espresso powder, baking soda, and salt so everything is evenly distributed and no espresso powder clumps hide in the flour.
- Bring the dough together gently:
- Gradually add the dry ingredients to the wet mixture, stirring with a spatula until just barely combined—overmixing develops gluten and makes the cookies tough. The dough should look shaggy but hold together.
- Roll and cut the cookie dough:
- Divide the dough in half and, working with one half at a time, roll it between two sheets of parchment paper to about 1/4 inch thickness. This keeps your hands clean and ensures even thickness for uniform baking.
- Cut and arrange on baking sheets:
- Using a 3-inch round cutter, cut out 16 cookies total and place them on parchment-lined baking sheets, spacing them about an inch apart. Chill the cut dough for 15 minutes while your oven preheats to 350°F.
- Bake until set at the edges:
- Bake for 10 to 12 minutes—they should look set around the edges but still look slightly underbaked in the very center. They'll continue cooking on the hot pan as they cool, so don't leave them in longer or they'll dry out.
- Churn the ice cream:
- While cookies cool, pour your chilled ice cream base into an ice cream maker and churn according to the manufacturer's instructions, usually about 20 to 30 minutes. The ice cream should have the consistency of soft-serve when finished.
- Freeze the churned ice cream:
- Spread the churned ice cream into a parchment-lined 9x13-inch pan to about 1 inch thick and freeze until solid, at least 2 hours. This creates a slab that's easy to cut into uniform rounds.
- Cut ice cream to match cookies:
- Remove the ice cream slab from the freezer and, using the same 3-inch round cutter, cut out 8 rounds. Work quickly so the ice cream doesn't melt, dipping the cutter in warm water between cuts if needed.
- Assemble with care and patience:
- Place one ice cream round between two cooled cookies and gently press them together—not so hard that ice cream squishes out the sides, just enough to hold it snug. If the ice cream is melting, pop the assembled sandwich back in the freezer for 10 minutes before moving to the next one.
- Wrap and final freeze:
- Wrap each finished sandwich in parchment paper and freeze for at least 1 hour before serving so everything sets solid and the flavors marry together.
 Pin It
 My sister called me one afternoon in a panic—she'd made these sandwiches for her daughter's birthday party and they were gone in five minutes flat. The kids wanted seconds, the adults were sneaking extras from the freezer when they thought no one was looking, and for that one afternoon, these little frozen treats became the thing everyone remembered about the party.
The Magic of Vanilla Bean
The first time I split open a real vanilla bean and scraped out those tiny black seeds, I understood why vanilla is so expensive and so worth it. Those seeds don't just taste better—they look beautiful against the cream, and when someone takes a bite and sees the specks, they know this is homemade. The flavor is rounded and complex, completely different from the sharp note of vanilla extract. If you can only afford real vanilla bean once, use it here because it's what transforms this from a good dessert into something memorable.
Espresso Powder: Your Secret Ingredient
I learned the hard way that instant espresso powder is not the same as ground espresso coffee, and that distinction matters. Ground coffee leaves gritty particles in the dough that feel strange on your teeth, while espresso powder dissolves completely and adds concentrated coffee flavor without any texture. Two tablespoons sounds like a lot, but it's not overwhelming—it just whispers in the background, making people wonder what they're tasting. Some batches I've made with less espresso turned out bland; some with more tasted like drinking coffee. This amount hits the exact sweet spot.
Assembly and Storage Tips
The moment between pulling the ice cream round from the pan and pressing it between two cookies is surprisingly delicate. Work fast but gently, and if your kitchen is warm, keep everything in the freezer between steps. These sandwiches actually taste better after they've frozen for a full 24 hours—the flavors meld and the cookies become tender from the moisture in the ice cream.
- For extra decadence, roll the sandwich edges in mini chocolate chips or crushed espresso beans right after assembly, while the ice cream is still tacky.
- Store wrapped sandwiches in the freezer for up to two weeks in an airtight container, though they never last that long in my house.
- If you want to serve them softer, pull them from the freezer 5 to 10 minutes before eating so the ice cream gets creamy without the cookies getting soggy.
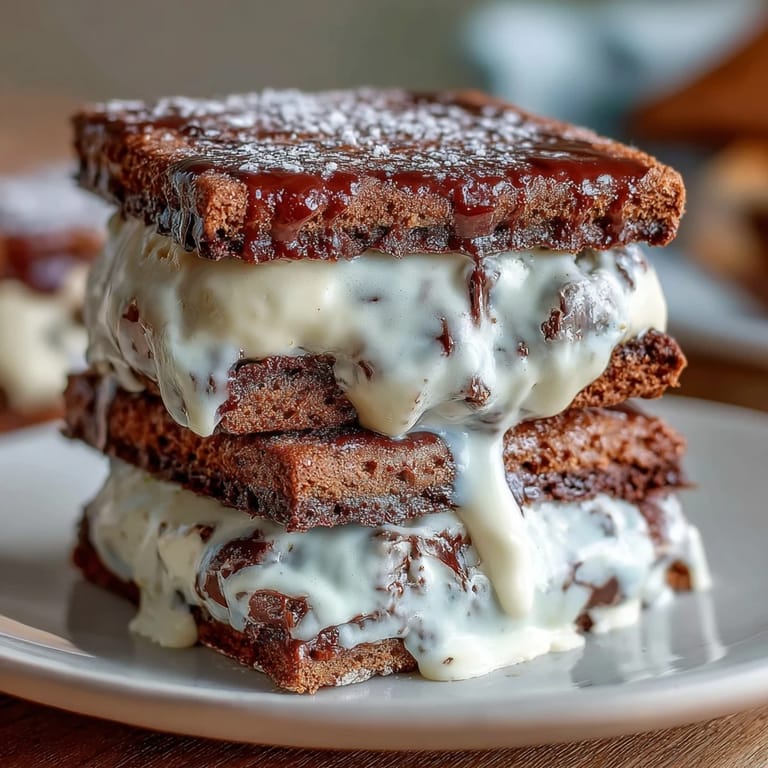 Pin It
 These sandwiches have become my answer to the question of what to bring to summer gatherings or give as gifts wrapped in pretty paper. There's something deeply satisfying about watching someone's face when they realize homemade ice cream sandwiches are possible, and even more satisfying when they ask for the recipe.
Recipe FAQs
- → How do I make sure the ice cream is creamy without an ice cream maker?
Freeze the ice cream mixture in a shallow dish, stirring every 30 minutes until it reaches a smooth, creamy consistency. This helps prevent ice crystals.
- → Can I use store-bought ice cream for this dessert?
Yes, substituting store-bought vanilla bean ice cream works well for a faster assembly and still maintains rich flavor.
- → What is the best way to cut the cookies and ice cream evenly?
Use a 3-inch round cookie cutter for both cookies and ice cream rounds to ensure uniform size and easy assembly.
- → How can I add extra texture or crunch to the sandwiches?
Roll the edges of the assembled sandwiches in mini chocolate chips or crushed espresso beans before freezing for added crunch.
- → What is the ideal chilling time before baking or assembling?
Chill the ice cream base for at least 2 hours before churning and freeze for 2 hours after spreading. Bake cookies immediately after preparing the dough for best results.